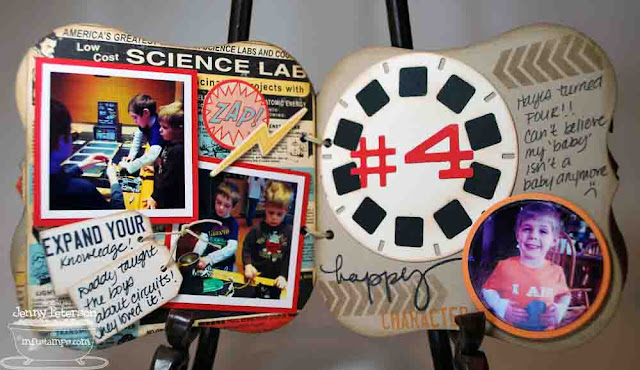
I have been working on this Mini Album for about a month. I intended to show it off for last months Release Rewind for My Favorite Things, but life just got in the way and I didn't get it finished! There are still a few pages I want to add, so I might go back and stick them in later!
I used a ton of MFT stamps and dies, and instead of linking them all in my post, I will have a shwack of links at the end that you can just click on, and the thumbnails will take you right to the product on the MFT shopping site.
Now, I don't know about any of you, but I get a little overwhelmed with scrapbooking (I think thats why I migrated to cards ;) ). A tip I have with people like me, for whom scrapbooking DOESN'T come easy, is to decide on a 'theme' or look that you want to achieve. I wanted a lot of bold text. I wanted boyish stamps and dies to suit my family and the photo's I used. I chose some specific colours. And then I sat on the floor and went thru all of my stamps that fit the bill, as well as my dies. Once I had a pile set aside, it became a little easier and I wasn't so overwhelmed with a huge selection of product, I had it narrowed down to a dozen or so sets and dies. If you are new to scrapbooking or feel like it's just 'too much', mini albums are a nice place to start :)The are relatively quick to make and they are cheap! You make your own album and fill it with whatever you have! To make my album a little sturdier I cut two pieces of CS for each page and used wide double sided tape to adhere them together (I have 3 boys that are going to want to take a look at the pictures of us! And I want them to want to look- thats the best thing about creating and preserving memories!).

For the cover I used: Mod Borders stamp set, Document it- Expand Your View stamp set, Star STAX, Accent It: Story Titles, Bottom Line Alphabet, Insert It- Instaframe, Boy Meets Girl, and Paper Doll Boy die-namics. And of course the album itself was made using the Mini Album Bracket STAX die. I added a Orange Fizz button tied with Hemp Cord, over the cork cut star.
On pages 1 and 2, you'll find: DI- Expand Your View for the sentiments, Accent It- Cute Cameras, Fishtails Flags Layers and STAX, Circle STAX, Hexagon STAX, a jellybean green button and Hemp Cord.
Pages 3 and 4 feature the following stamps: Mod Borders, DI- Expand your View and Birthday Sentiments. The dies that were used: Bottom Line Numbers and Symbols, LLD Accent It- Reel Life and Circle STAX 1 and 2.
Up next are pages 5 and 6. For these I used: By the Letter- Uppercase alphabet, Circle STAX 2 (to build the lego block- my FAVE!), Banner Strip, Looped Border, Artist Palette and Brush, Say What? Die-namics, and You Make My Day stamp set. I added a triple strip of hemp cord to the Lego page.
For the last pages (7 and 8) I used a combination of these stamp sets: Mod Borders, Chocolate Sentiments, Hello My Name Is, Birthday Sentiments, and Document it- Right This Way. The die-namics that I used were: Accent it- Rock and Roll (the star), Hearts a Plenty, By the Letter- Uppercase alpha, Fishtail Flags STAX and Layers, Paper doll Boy border, cut from Cork (with one little girl (ME!) fussy cut and stuck in the middle, using the Boy Meets Girl paper doll border). I also used the Cute CAmeras again.
Here is the back of the album. I used Bottom Line Numbers and Symbols for the year, and added my custom stamp under that.
I hope that you've enjoyed a little peek into my family life :) And we'll see you back here in a bit, for the first day of MFT May Teasers!!


