Hi there! Hope everyone is having a wonderful Christmas season!! We had a very nice Christmas, with my hubby and I hosting his extended family….I think there was around 35 of us? It was a lot anyway LOL! It's been ages since I posted! Thankfully I am on some wonderful DT's that give us a nice break during the holiday season to spend with our families :) We are actually heading out in a few hours to go on a little ski trip! The kids are very excited (minus one, who is getting over a bought of the stomach flu)!
I actually made these little tags and card WAYYYY back, but haven't posted them- I actually sent the card to someone and had forgotten to take a photo of it, so I asked her to, and send it to me LOL! I think she's a better photog than me, so be nice ;)
I've used this months Reverse Confetti SFYTT for my card layout. I used the stamp sets Seasonal Sentiments and Tinsel and Trim. And the following Confetti Cuts: Circle Garland, Let it Snow, Tag Me, Tag Me, Too, and Love Note. The little moustaches on the tags are from a die set by The Cat's Pajamas.
Here's the big tag and the two smaller tags to go with the card:
A peek underneath the vellum tag layer…
And the backside of the large tag, before I filled in the 'for' and 'love'…..
All attached to the prezzie and ready to go :)
Showing posts with label SFYTT. Show all posts
Monday, December 29, 2014
Monday, November 17, 2014
{Reverse Confetti} North Pole Delivery!
Hey there! I have a card to show you today that I made with my new Reverse Confetti products! I put in a rather large order, as I loved all of their last release! It was hard not to buy the whole nine yards! But I did snatch up this awesome stamp set North Pole Wishes- I just love the fonts and the little envie and holly accessories! I am kinda kicking myself that I didn't order the co-ordinating die set, but I was trying to make cuts to my cart where I thought I could get away with using my scissors. I wish I would have had the dies LOL! I might add them into my next order ;)
I really thought the one piece chevron die was unique- it's called Triple Chevies. The snowflake die set, Let it Snow, also has a unique, more squarish look, so I had to get it too ;)
I also used my trusty go-to layering tools from Perfect Paper Crafting: Perfect Cutting Mat and Perfect Layers Mini to get my black 1/16th" borders. Use code Jenny5% to receive 5% off your order!
I used the November SFYTT, replaced the rectangle panels with the chevrons and moved the circle to the other side.
Wednesday, October 15, 2014
{RC} Hoot Hoot Hooray!
Hi there! Tonight I have a card to share with you that I made using some awesome Reverse Confetti products, as well as Perfect Paper Crafting Tools. I made this card using the current Reverse Confetti SFYTT. The sketch challenge lasts ALL month long now, so I am super excited about that! I love sketch challenges!
Here's the details! I used Oliver Owl and sentiment. I coloured him with copics and paper-pieced his shirt and tie and adhered his tie just at the top, giving the bottom a little curl to add some dimension! I added glossy accents to his eyes, beak and feet. I popped him up on foam dots onto an MFT stitched circle die. I added some wooden dots, a wooden star and a wood button tied with MFT's twine. the wood dots and button were kind of a boring light colour so I used a sponge and distress ink to give them some nice warmth.
I got my nice even borders using PPC's awesome tools- Perfect Layers Mini and Perfect Cutting Mat…two of my fave tools for card making! Remember to use my code: Jenny5% to save on your order!! I am really loving the way this masculine card turned out and I am planning on saving it for my FIL's bday this winter. It reminds me of him, LOL!
Here is the inside….kept it plain and simple, with a strip of DP and another sentiment from the set.
Wednesday, October 8, 2014
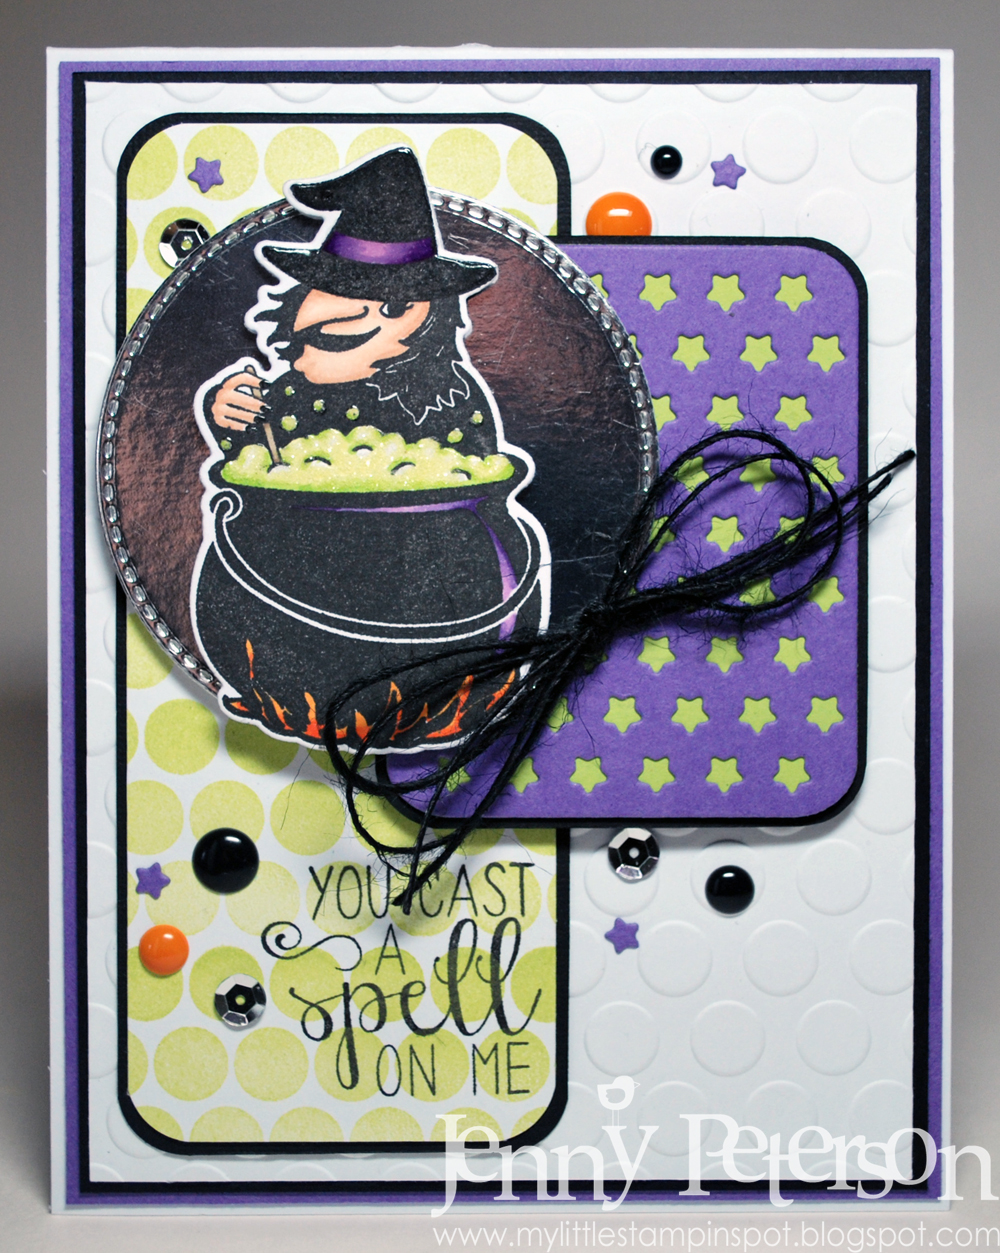
{RC} Cast a Spell on Me
Today I have a card to share with you that I made for Reverse Confetti's October SFYTT. I used Cast A Spell and coordinating Cast A Spell confetti cuts. The little star cut panel behind is Stars Pretty Panel Confetti Cuts, backed with the rectangle panel from the Class Act confetti cut. I love that these dies all work so well with each other! I added a few of the lil stars along with sequins and enamel dots for a cute embellishment. The longer panel was stamped with Memento Luxe ink in Pear Tart using the Whole Lotta Dots stamp. I stamped the sentiment in black versa fine ink over top of the pattern.
Sunday, September 14, 2014
{RC} SFYTT- Hello Pumpkin
Hey there!! Today I have a quick card to show you that I made for Reverse Confetti's sketch challenge this month. Unfortunately, due to the unbelievably sad and slow
internet access I have, a wayyyyy out here in the country, I was unable to get it into the contest in time. A mere 7 minutes. Thanks a bunch Platinum internet. You suck, as always.
Anyway, here is my card and I am kinda liking it! Sometimes it's nice to get back to the basics and just stamp! I used a few different RC stamps and dies: Forever Fall for the small pumpkin and the sentiment, Class Act for the larger pumpkin (which is actually the apple turned upside down), Class Act Confetti Cuts, Tag Me, Too confetti cuts and Whole Lotta Dots.
My CS is MFT, as well as the circle dies, button and twine. I added some MME enamel dots in as well. Thanks for stopping by!! Be sure to pop in tomorrow, as I have something different going on then ;)
Thursday, May 1, 2014
{Reverse Confetti} Foxy Friend
Hey there! I had some stampy time this afternoon- my middle boy was home sick and so my hubby had to take the littlest on his preschool field trip to the Dinosaur museum! Between a billion loads of laundry, and finishing off some tiling in our reno's, I popped a few cards out!
I just loved the new Reverse Confetti SFYTT#12 that went up on the blog this morning…I knew I wanted to play along!
I used this sweet Frieda Fox from the Quirky Cuties line and coloured her up in warm greys- she's a silver fox, just like me! lol! I am seriously in desperate need of a dye! Lawd help me, these boys are making me grey! I pieced her lil dress and coloured the rest in copics, adding some black pastel pencil for shading. I added some glossy accents to her nose and ears, and painted some Wink of Stella pen on her shoes. And my fave part? The embossed vellum glasses!! ACK! I adhered the centre flat down to her face and added wee snippets of dimensionals to the outer corner.
I used some more enamel dots, adding a silver one to the flower centre. I even used an enamel shape! My friend Sarah tells me that these lil doohicky's are called geo-tags and are apparently quite popular right now…trendy I am not! lol! The sentiment was stamped onto a vellum die cut (MFT) and heat embossed as well. The little heart and the scallop border are from the die set Love Note. I added some machine stitching and dry embossed with an SU folder. The DP is by Chickaniddy (Date Night).
Here's the sketch:
Saturday, April 12, 2014
{RC} Hey Chickie!
I decided to have some Easter fun with my new Reverse Confetti haul! I made a card and coordinating treat bag with tag using the new Carton Cuties and co-ordinating Carton Cutie Confetti Cuts dies. For some reason, I love egg cartons! I know that sounds strange, but I think it reminds me of my childhood and helping my grandma with her chickens…I'm gonna go with that explanation anyway. lol!
This card has tons of dimension! The carton was actually cut twice, so the lower section is popped out even beyond the chick and eggs to make it look more 3 dimensional! Here's a side view:
A close-up of the little matching tag on the bag of chickie peeps!
Here's the card on it's own. I cut two Love Note scallop rectangle dies, fussy cutting the inner rectangle portion of one of the patterns and mounting it on foam dots over the green patterned cut. I coloured the carton a bit with some copics right onto the Kraft CS. The little sentiment banner is again from Tag Me.
I used this months SFYTT for the card layout.
OMGGGGGG! Look at the cute lil bow tie on the chickie!!
Other products used on my set: MFT twine and buttons, various enamel dots, MME DP, SU and MFT CS, SU dimensionals, copics, X-press it blending CS, machine stitching, memento and versa fine ink, marshmallow peeps, cellophane bag
Tuesday, November 5, 2013
{TSG232} Pattern Power
This week our challenge is brought to us by Sarah! She has challenged us to make a card or project using patterns…dots and stripes specifically. She wants us to use both on our cards or projects!!!
Here's a closeup of the adorable bear from the set Life is A Circus! I pieced his outfit, and added some red brads for the buttons. The sentiment banner is actually a builder stamp, the dots, outline, sticks and words are all separate stamps! I popped the banner up on dimensionals.
For my card layout, I used the sketch from November's SFYTT!
To be eligible for the giveaway, create a NEW card or project using the Pattern Power challenge, and then come back to the TSG Blog to add your name and a link to your project in the InLinkz that is located at the bottom of this challenge post. This challenge is open until the winner has been announced on the following Monday (November 11th). The winner will get a $5 gift certificate to use in the TSG Web store!
By participating in this challenge, you may also find yourself in the Trendsetting Spotlight that shines on the TSG Blog every Thursday. We will be on the lookout to find challenge cards that stand out and show Trendsetting qualities. TSG stamps are not required to participate in the challenges but are appreciated :)
You do not need to have a blog to be able to participate in the TSG Challenges! You can simply add the URL link from your project after it has been uploaded to your online craft gallery. If you upload your card to an online craft gallery, please use the keyword TSG232 so we can check out your beautiful work!
Friday, December 7, 2012
{KKS Previews} Party Monsters!
Today at Kraftin' Kimmie Stamps we are sharing a new set by the totally talented Emilie Goulet!!! We've got something super fun and so unique for you!! Perfect for the little kiddos in your life....and maybe young at heart peeps too Let us introduce..... PARTY MONSTERS!! Emilie has created a fun set of MONSTER images for your cards and scrapbook pages!
I've used this month's Jen's SFYTT for my LO, coloured him with copics, added a speck of white gel pen to his cheeks and stamped the sentiment in Versafine Onyx Black ink (the best for the blackest black on patterned paper!)
Below you will find a list of all the Krafty Girls who are sharing PEEKS with you today!! And as you're hoppin' around, be sure to leave a comment at each stop because someone will win a package of these fun stamps!!
All our new DECEMBER 2012 stamps will be available on Sunday at the Kraftin' Kimmie Stamps Shop!!! And come on back tomorrow because not only will we have a fantastic new challenge for you, but we'll be revealing the NEW stamps by Annie Rodrigue!!! Get ready to take a trip ......to the CIRCUS
Saturday, September 8, 2012
{KKS} Byte Me
This weeks challenge at Kraftin' Kimmie Stamps is brought to you by one of newbie Krafty Girls, Miss Jessie Rone! She wants us to paper-piece. I {heart} paper-piecing, so this was a fun one for me:)
I used Gadget Girl, colouring her with copics and piecing the little ottoman that she is sitting on.
I did some piercing and added a swirly clip....Hmmmm....maybe I had Jessie on the brain;) hehe! I tied a double black jute twine bow on the clip and tucked it under the main panel. The 'Byte Me' sentiment was stamped in versafine ink and I added a little strip of metal accents under to make it pop a bit more. I shined up her laptop and phone with glaze pen.
Check out the Krafty Blog for more inspiration, as well as our linky tool...play along this week and you could be the random winner of Lola Lollipop!
Sketch: September SFYTT (which Kraftin' Kimmie is sponsoring this month!! We'd love to have our customers play along!)
Wednesday, July 25, 2012
{July SFYTT} For Papa
Hiya blogger friends:) I owe my Dad a Birthday card, and thought that this months Sketch For You to Try was a really easy looking layout, and with the busy day I had, I needed a relatively 'quick' card;) I also knew that I wanted to use MFT's Masculine Graphic Tee die and stamp set for Dad. That's good, since MFT is this months SFYTT's sponsor! Whoop!
Since having kids, I usually make cards for my folks and in-laws with a Grandma/Grandpa spin. My Dad is called 'Papa' by all the grandkids, but the MFT stamp in the set is Grandpa.....quick fix! I just taped off the grand portion with scotch tape before inking, then removed the tape before stamping, doing that twice to make Papa!
He's also a farmer and John Deere is how he rolls (literally;), so I went with the classic John Deere green and yellow colour combo! I cut a little tractor from the dp and used a foam dot to adhere it to the shirt. I added some brads at the bottom and embossed the main DP with a chicken wire EF from Tim Holtz. The ink is a combo of SU and Distress inks, and the CS is SU (old olive and early espresso)
Here is the inside, using more amazing DP scraps, and the '#1' stamp from the set:
Thanks for stopping by, and we'll see you later for a fresh new iSSC and YNS Fun Friday Christmas card!!
I have had a few ppl who havecomplained kindly pointed out, that I don't tell any funny stories or post pics other than cards on my blog anymore. Well, that's very true, and it's because I now represent alot of different companies, probably none of which smile upon me sharing my kids poop stories, odd discipline tactics, marital shortcomings, and things like that with their readers and customers....But this card is just for me and my dad, so I'll go ahead and let you in on a personal bit related to this card and my dad:)
Here are some pics from last years harvest....Papa with a handfull of his grandkids. From left: Jake (at the front), Lucas (at the door), Hayes, Papa and Ryan on the ground! Missing were Harley, Gracie and Denim. And before anybody flips their kite and calls Farm Safety, the combine was NOT running when the kids were up on the top- there was no chance they could be sucked into the header and end up in someones loaf of bread. Take a breath. All good? okay....
And here are some of the gang in the old motorhome (which my SIL and I load up with food and kids and drive out to the action for 'meals in the field'!) It's a pretty sweet ride;) lol!! We drive like all hell (well, mostly me;) and constantly check for stubble fires in the undercarriage with the sideviews (she rides a little low to the ground)!! It's fun being a hillbilly, lemme tell ya;) And no, the kids are not wearing seatbelts when we tear through the wheat feilds at mock nine (seriously, this thing only can get up to 80 kph...not cool). Again, please refrain from ringing social services. This is an old-school operation and in the good ol days, your babies rode home from the hospital in a basket on the backseat. Dat's how we be rollin' in the Citation.
LOOK OUT CAT!!!!
Since having kids, I usually make cards for my folks and in-laws with a Grandma/Grandpa spin. My Dad is called 'Papa' by all the grandkids, but the MFT stamp in the set is Grandpa.....quick fix! I just taped off the grand portion with scotch tape before inking, then removed the tape before stamping, doing that twice to make Papa!
He's also a farmer and John Deere is how he rolls (literally;), so I went with the classic John Deere green and yellow colour combo! I cut a little tractor from the dp and used a foam dot to adhere it to the shirt. I added some brads at the bottom and embossed the main DP with a chicken wire EF from Tim Holtz. The ink is a combo of SU and Distress inks, and the CS is SU (old olive and early espresso)
Here is the inside, using more amazing DP scraps, and the '#1' stamp from the set:
And here's this month sketch if you want to play along.
Thanks for stopping by, and we'll see you later for a fresh new iSSC and YNS Fun Friday Christmas card!!
I have had a few ppl who have
Here are some pics from last years harvest....Papa with a handfull of his grandkids. From left: Jake (at the front), Lucas (at the door), Hayes, Papa and Ryan on the ground! Missing were Harley, Gracie and Denim. And before anybody flips their kite and calls Farm Safety, the combine was NOT running when the kids were up on the top- there was no chance they could be sucked into the header and end up in someones loaf of bread. Take a breath. All good? okay....
And here are some of the gang in the old motorhome (which my SIL and I load up with food and kids and drive out to the action for 'meals in the field'!) It's a pretty sweet ride;) lol!! We drive like all hell (well, mostly me;) and constantly check for stubble fires in the undercarriage with the sideviews (she rides a little low to the ground)!! It's fun being a hillbilly, lemme tell ya;) And no, the kids are not wearing seatbelts when we tear through the wheat feilds at mock nine (seriously, this thing only can get up to 80 kph...not cool). Again, please refrain from ringing social services. This is an old-school operation and in the good ol days, your babies rode home from the hospital in a basket on the backseat. Dat's how we be rollin' in the Citation.
Hopefully you've enjoyed the glimpse into 'me'! So long for now!!! (yep, that's me waving bye;)
LOOK OUT CAT!!!!
Wednesday, June 27, 2012
{YNS/RC} Blog Hop!
I am so excited for today's blog hop merger of two awesome companies, both of which I am lucky to design for: Your Next Stamp and The Ribbon Carousel!!! How fun is that!?!
And to add to the fun, Karen (she is super-awesome, I can vouch for that!), owner of Your Next Stamp is generously offering a coupon code to all blog hop participants for 15% off any online order placed from today through June 30th!
Be sure to take advantage of that deal!
I've used YNS's Kai from Hawaii (one of our cute World Kids Collection) on today's card, as well as two great products from the RC: Divine Twine in Orange and Jute Twine in Natural.
Some dies that I used are The Cat's Pajamas Wave Cutup & MFT's Hibiscus and Sunshine Dienamics. I found a neat button in my stash (I think MME) and what do you know, the backside looks like the coconut necklace that Kai is wearing! I love it when things just fall into place!
His little surfboard is paper-pieced and popped up using dimensionals. He is fussy cut and popped up as well! I thought there was too much orange happening with the sun, so I used the divine twine to make some wraps around the centre and I think it adds so much more:) I coloured Kai with copics and added clear and buttermilk spica glitter to his hair (very conservatively- I just wanted that summer blonde hair that just glimmers like the sand)...his necklace and trunks are coated with glaze pen, as are his eyes and the star and edging of the board. I coloured his skin a little darker than my usual combo (this time using E00, E11 and E13, rather than my usual caucasian E000, E00, E11)..I wanted him to look like a total surfer beach bum, all tan!
I used this month's SFYTT by Jen del Muro....this is such a keeper as far as sketches go:) And you still have time to get your card in for that;)
OK, let talk PRIZES!
Hop along and leave some blog love for our designers for a chance to win!
The Ribbon Carousel is giving away a ribbon carousel!
Your Next Stamp is giving away a $10 YNS online Gift Card to spend on stamps of choice!
Friday, April 27, 2012
{KKS126} Swing into Spring
It's been awhile since I played along with my fellow Krafty Girls, and this week our challenge (126) is to add some spring to our step and make a spring themed card! I hadn't yet used this sweet Lulu on a swing from the March release, so I knew I wanted to ink her up for this challenge.
I used Jen's April SFYTT (there are still a few days to get your card in- Remember the amazing prize package drawn at the end of the year for stampers who participated in every month!!).....
I used one of the lulu's from the Springtime Lulu set. This is such a sweet set and comes with three Lulu's and six sentiments!
I added green pearls to the spellbinders die, and a paper flower from the dollar store (I know, right?) anchors the sentiment flag...some SU! ribbon was wrapped around the DP.
And here's a little close-up. I used sakura glaze pen on her hair baubles, the ladybug, swing bolts, eyes and shoes. Her pieced dress was shaded with warm grey tone copics to add some depth. I don't always do this, because I don't get to hung up on what looks real and doesn't, as these are paper cards! Not real ppl! But if I am in the mood, then I do;) Sometimes just to add some variation to two things that can run together if no borders are defined (the skirt part of the dress and the top).
Okay, check out the Krafty Blog for more Springy cards and link up your card for a chance to win some new rubbah! Oh yeah- don't forget about our FB fan page, where Kim has another generous challenge giveway going on:) There are still a few days to enter that one!
I used Jen's April SFYTT (there are still a few days to get your card in- Remember the amazing prize package drawn at the end of the year for stampers who participated in every month!!).....
I used one of the lulu's from the Springtime Lulu set. This is such a sweet set and comes with three Lulu's and six sentiments!
I added green pearls to the spellbinders die, and a paper flower from the dollar store (I know, right?) anchors the sentiment flag...some SU! ribbon was wrapped around the DP.
And here's a little close-up. I used sakura glaze pen on her hair baubles, the ladybug, swing bolts, eyes and shoes. Her pieced dress was shaded with warm grey tone copics to add some depth. I don't always do this, because I don't get to hung up on what looks real and doesn't, as these are paper cards! Not real ppl! But if I am in the mood, then I do;) Sometimes just to add some variation to two things that can run together if no borders are defined (the skirt part of the dress and the top).
Okay, check out the Krafty Blog for more Springy cards and link up your card for a chance to win some new rubbah! Oh yeah- don't forget about our FB fan page, where Kim has another generous challenge giveway going on:) There are still a few days to enter that one!
Subscribe to:
Posts (Atom)